Whether you are brand new to RVing (either part time, full time, or a weekend warrior) there are some basic maintenance items which you must take care of to help keep your RV in tip top shape. While many people might only think of spring cleaning and stocking your RV for the upcoming season, in truth there are many more things you should consider looking at. In this article we look at what you should look at in terms of basic RV maintenance, including inspecting, cleaning and more.
EXTERIOR BODY
 You should also grab a ladder and get up on your RV to inspect your roof. Most newer RVs are made of a single piece of roofing material and are less prone to leaks, but that doesn’t mean they can’t leak.
Leaks can develop around things like air conditioners, solar panels and vents. So be sure to look carefully around those areas for cracks or breaks either in the roofing material, or the joint between these and the roofing material.
If you have seams in your roof, such as between the joints of 2 different pieces of roofing material, you should inspect those closely. And if it’s been any length of time, or you don’t know when last they were repaired, it might be a good idea to scrape off the old silicone/sealant/whatever was used to seal the joints and redo them. For example, if your RV is older and has a tin roof, you should consider getting a good can of seam sealer and scrape off the old stuff before applying the new sealer.
ROOF
 You should also grab a ladder and get up on your RV to inspect your roof. Most newer RVs are made of a single piece of roofing material and are less prone to leaks, but that doesn’t mean they can’t leak.
Leaks can develop around things like air conditioners, solar panels and vents. So be sure to look carefully around those areas for cracks or breaks either in the roofing material, or the joint between these and the roofing material.
If you have seams in your roof, such as between the joints of 2 different pieces of roofing material, you should inspect those closely. And if it’s been any length of time, or you don’t know when last they were repaired, it might be a good idea to scrape off the old silicone/sealant/whatever was used to seal the joints and redo them. For example, if your RV is older and has a tin roof, you should consider getting a good can of seam sealer and scrape off the old stuff before applying the new sealer.
TIRES AND WHEELS
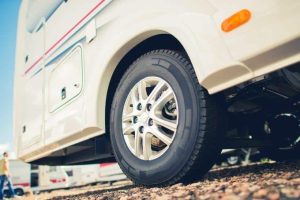 All to often many people forget about their tires and wheels, but as you may already know, these are among the most important parts of the RV.
Inspect your tires for wear and cracks. If you aren’t sure if there is too much wear, consider taking your RV to a dealership, or call in someone who does mobile repair and have them inspect your tires for you. At the same time they can remove the wheels and inspect and lubricate your brakes and bearings.
You should also check your tire pressure and add or remove air as needed to ensure your tires are inflated to their optimum PSI. Also, don’t forget to inspect your spare tire.
GENERATOR
 If your RV has an onboard generator, first inspect it for leaks and check any fluids. If the oil is dark or has a smell it may be time to change it. Some generators are sealed units, so no fluid changing is required, but many are like any other engine and need to have their oil changed from time to time.
Also be sure to start your generator and let it run for 10 or 15 minutes, especially if it is the first time this season you’ve started it up.
JACKS, HITCHES AND BUMPERS
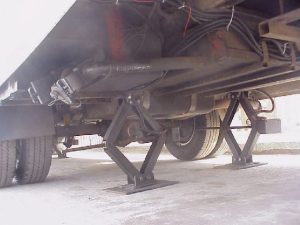 Take the time to visually inspect any other exterior accessories, such as removable/retractable jacks (power or manual), hitches and/or fifth wheel pins, as well as the rear bumper and any accessories attached to it.
If needed, you may need to lubricate the joints of your jacks, and perhaps even grease up your hitch pin or ball receiver. You should check your manufacturer’s manual for the specifications of these.
WATER HOSES, SEWER HOSES, POWER CABLES
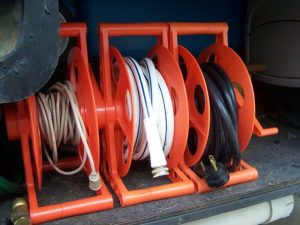 As with everything else on this list, you should also do a visual inspection of all your hoses and power cords.
You want to be sure your water hose has no leaks, kinks or soft spots that could lead to a rupture. Also check and replace the hose washers if needed. Once you’ve inspected the hose, hook it up to a water outlet and run some water through it. Ideally you could put a hose head on or find some way to block the outlet of your hose so that you can pressure test it to make sure it isn’t leaking anywhere.
It’s also important to take the time to visually inspect your sewer hose(s) for damage and leaks. Ensure they have maintained their flexibility as well. Once you have inspected for damage, and assuming they are clean, you should run some water through them just to make sure there are no leaks.
Any power cords, including extension cords you bring with you should also be checked for damage including fraying wires, burned or damaged ends and areas where a kink may have occurred which could have damaged the cord.
PROPANE TANKS
 Some RVs (such as motorhomes) have built in propane tanks, while others use removable ones. In either case, these should also be checked.
In Canada, portable propane tanks need to be inspected and recertified every 10 years. The date or original manufacture, as well as any recertification dates are stamped on the collar of the tank. You can find out how to read your tanks here (this is a PDF that opens in a new window), or if you prefer simply take it to station that refills them and they can check the date for you and let you know when they expire.
Onboard tanks, like you find in a motorhome, also need to be visually inspected. Your RV should have a sticker saying when it was last checked. Also, check with your provinces local authorities as each province has different rules when it comes to the storage and usage of propane tanks.
MISCELLANEOUS
Anything else on the outside of your rig, from exterior lighting, to speakers, electronics, power outlets etc. These should also be inspected carefully for damage and repaired or replaced as needed.
Once you have completed your full exterior inspection, you can move on to the interior.