What You’ll Need

Introduction
A couple years ago we spent a few months over the winter in Nevada. We brought our Shaw Direct satellite system with us, even though we were told it would not work for us down there.
However, my thinking was – it’s a satellite dish – how can it not work?
Well the truth is, it did work – mostly – we had all our SD channels, but the signal wasn’t strong enough to get our HD channels.
But that was ok with us since our local broadcaster was only in SD therefore we were able to watch our local news and keep up with what was happening at home even though we were thousands of miles away.
So I put together this tutorial to help you point your Shaw dish. While it is for Shaw Direct, it should work for any satellite system. You just need to know what satellite(s) to point your dish at.
Before you begin, there are a few things you should have as it will make the process much easier.
First, I suggest a dish pointer. While you can do this without it, I highly recommend every dish owner who travels with their dish get one. It’s saved me countless hours pointing my dish.
The model to the left is the one I use. It’s not the most expensive one (in fact it’s one of the cheaper models out there) but it’s perfect for this job. Of course you can use any model you like, as long as it works!
You should also have a compass handy. I use this for general pointing. I have it set to always point to where the satellite should be in the sky. This why I can point my dish in the right general direction to start.
You will also want to get an app for your phone. I like the “Satellite Dish Pointer” app for Android by Foxsmith Technology Ltd.
I’d also suggest getting a couple more cable ends and barrel connector. But don’t cheap out and get the dollar store ones. Make sure you get new ends meant for the heavier satellite cable. I’m suggesting this as a time saver.
When you are ready to point your dish, first turn off your receiver. This is because your receiver sends power through the cable to the LNB in order to help receive the signal. You want to be sure there is no power going through the cable before you do this next part:
What I did is disconnect the cable from the dish LNB and cut off about a foot from the end. I then crimped on 2 new ends to each cable, and saved the barrel connector for later.
Now, install the dish pointer between the ends you just added. Make sure you put it the right way. On the device it shows the LNB goes on one end, and the other goes to the cable attached to your receiver.
Once you’ve put the finder in the cable you can reconnect the shorter cable to the LNB and power on your receiver. Turn the little knob on the device up until you start hearing a tone.
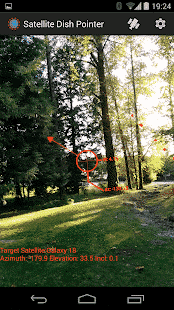 Now open the app you installed on your phone and put in the correct satellite. To do that, press the little satellite icon at the upper right.
At the time of my writing of this article, you want to point to -123.0 Galaxy 18, Once you have selected the correct satellite you can go back to the main screen.
The app uses your rear facing camera to help you point the dish towards the satellite. The one problem I have with this app is that the dish elevation is wrong, but it gives you the right direction for the satellite. That’s about all I use this for.
 Next, you need to set the elevation on your dish. To do this you’ll need a small wrench to loosen the bolts on the sides of the dish. On one side you will see numbers stamped into the metal. This is the elevation you want.
To get the elevation you want, go to https://www.dishpointer.com/ (link opens in a new window) and select “-123.0 West GALAXY 18 (G-18)”. Then put in your location. You can either use the site’s auto detection feature (below where it says location) or type in the address. Once you do that you will see the elevation you want. Tilt your dish up until you are around 47 and tighten the bolts.
Now, stand behind your dish with your phone and see if it’s pointed in generally the right direction. Loosen the adjuster bolts on the back of the dish so it will move around for you. Now slowly tilt the dish back and forth. You should hear a tone coming from your satellite finding device. Twist the dish until you hear the tone really loud.
Turn down the tone volume and continue playing with the dish, moving it back and forth until you are confident that the tone you hear is the loudest it can be.
Now go inside your rig (or have someone help you) to look at the signal on your receiver. If you’ve done your job correctly, you should see a green bar on the screen that indicates you are pointed correctly.
If not, repeat the steps above until you have the strongest signal you can.
Remember that your dish and receiver are tuned for Canadian use. Therefore you aren’t going to get a full signal, but you should be able to receive many Canadian channels on your Shaw Direct dish